
Framing note before the content: Per your recommendation, I’ve written this as replacement/expansion content for the existing “Depth and Application: Where Most Homeowners Get It Wrong” section of your Spring Mulching Guide — not a new standalone URL. Your current section already covers the core 2–3 inch rule and volcano mulching well; this expands it to match the fuller outline (measuring, refreshing vs. new, shrub/tree-specific depth, and the removal decision) while keeping the parts that already work. I have no way to check actual search-volume data for “mulch depth” as a standalone keyword from here, so I’ve defaulted to your stated fallback (expand the existing guide) rather than guessing that a dedicated URL is justified. If you later see keyword data that changes that calculus, this same content is written narrowly enough to lift out into its own page with minimal rework — see the closing note for what that would take.
Proper Mulch Depth: Quick Answer
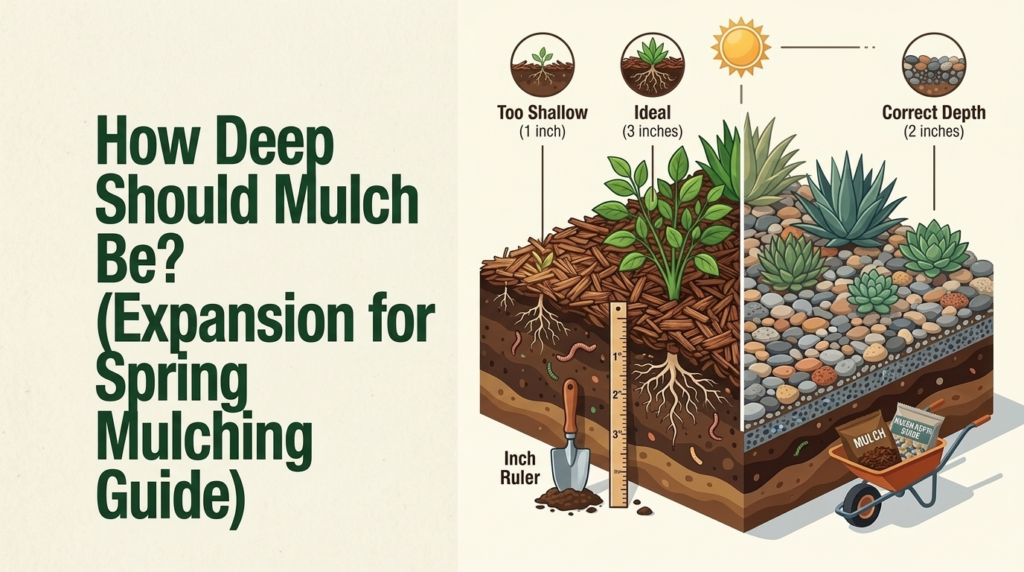
Two to three inches, maintained consistently across the entire bed, is the correct depth for mulch — not the one to six inches most homeowners guess when asked. That range isn’t arbitrary: it’s the functional threshold where mulch actually suppresses weeds and holds moisture without creating the excess-moisture and oxygen problems that show up at greater depths. Depth matters more than mulch type, more than color, and more than brand — it’s the single most common mistake in residential mulching, and it’s also the easiest one to fix once you know what to look for.
Why Too Little Mulch Fails
Less than two inches of mulch doesn’t provide meaningful weed suppression or moisture retention — it’s mulch for appearance only, not function. Light still reaches the soil surface at that depth, which means weed seeds still germinate at close to their normal rate, and the thin layer doesn’t hold enough moisture to meaningfully reduce how often beds need watering. Homeowners who spread mulch thinly to stretch a bag further, or who let a layer wear down between refreshes, end up paying for mulch’s appearance without getting its actual benefits — the weeds and watering needs come right back.
Why Too Much Mulch Can Hurt Plants
More than three inches doesn’t just waste material — it actively works against the plants underneath it. A thick, poorly-oxygenated mat holds excessive moisture against plant stems and crowns, which promotes fungal rot in exactly the tissue that’s most vulnerable to it. It can also restrict oxygen to roots and, counterintuitively, prevent light rain from penetrating through to the root zone at all, since a thick enough layer sheds a light shower before it ever reaches the soil. This is the most common depth mistake in practice: it happens gradually, when fresh mulch gets added on top of an existing layer every year without ever removing what’s already there.
New Mulch vs Refreshing Existing Mulch
This is where the depth problem usually actually originates. Over three to four years of annual top-dressing without removal, a bed that started at a correct two to three inches can quietly accumulate five to eight inches of old, partially-decomposed material — well past the point where it’s helping anything. Before new mulch goes down, the existing layer needs to be assessed, not just covered: pull back the top layer, check what’s underneath, and if the bed is already at or near three inches, a fresh application should mean removing old material first, not simply adding more on top.
A bed that’s genuinely below two inches — recently installed, or where mulch has fully broken down and thinned out — is a straightforward case for a full new application. A bed with a moderate existing layer often just needs raking to loosen and refresh the top inch, followed by a thin top-off rather than a full fresh layer. The mistake to avoid either way is treating “mulching” as an annual reflex that always means adding a full new layer regardless of what’s already there.
Mulch Depth Around Shrubs
Shrub beds follow the same two-to-three-inch standard as any other planting bed, but the practical risk is concentrated closer to the stems than in open bed areas. Mulch piled up against a shrub’s base creates the same moisture-trapping problem that causes bark and stem issues on trees, just at a smaller scale — keeping mulch a few inches back from the actual stem, even while maintaining full depth in the surrounding bed, avoids that without sacrificing the weed suppression and moisture benefits mulch provides for the shrub’s root zone.
Mulch Depth Around Trees
Tree mulch depth follows the same two-to-three-inch rule, but the shape and placement matter as much as the depth. Mulch around a tree should form a flat, even ring — extending out toward the drip line where practical — rather than the cone-shaped “volcano” pile against the trunk that’s common on residential properties throughout Cecil County. Mulch piled directly against bark traps moisture against tissue that isn’t built to stay wet, which over time causes bark decay, opens pathways for disease and insect pests, and contributes to girdling root development that produces a slow decline many homeowners mistake for drought stress or disease unrelated to the mulch itself. (We’ll have a full, dedicated guide on correct tree mulching technique — including how to fix an existing mulch volcano — coming soon.)
Mulch Depth for Weed Suppression
Depth and weed suppression are directly linked, and the same two-to-three-inch range is the functional threshold here too — not a general guideline that happens to also apply to weeds. Below two inches, enough light reaches the soil for most annual weed seeds to germinate close to normal. Above three inches, the top layer tends to dry out into a loose, friable surface that’s actually an easier germination bed for wind-blown weed seeds than a correctly maintained layer underneath it. It’s also worth being direct about a limitation: no depth of mulch stops already-established perennial weeds like nutsedge, ground ivy, or bindweed, which grow up through any thickness of mulch from root systems that survive underneath it. Our guide on keeping weeds out of landscape beds covers the fuller weed-control picture — pre-emergent timing and edging alongside correct mulch depth — since depth alone was never going to solve perennial weeds specifically.
How to Measure Existing Mulch
Checking actual depth takes less effort than most homeowners assume, and it removes the guesswork that leads to the over-application problem in the first place. Push a small trowel or a ruler straight down into the mulch at several different spots around the bed — not just one, since depth is rarely uniform across an entire bed — until it hits the original soil line, and read the depth directly off the tool. Checking in three or four spots per bed, including areas near the edges and near larger plants where mulch tends to pile up unevenly, gives a much more accurate picture than eyeballing it from a standing position, which is where most depth misjudgments actually happen.
Should Old Mulch Be Removed?
Not always, but often enough that it shouldn’t be skipped as a default step. If existing mulch measures close to the two-to-three-inch target and is reasonably intact rather than compacted into a solid mat, raking it to break up the surface and refresh its color is usually enough — no removal needed. If a bed has accumulated well beyond three inches after multiple years of top-dressing, or if the old material has broken down into a dense, soil-like layer that’s stopped functioning as mulch at all, at least partial removal is the correct call before adding anything new. Skipping that step and mulching over an already-too-deep bed is exactly how beds end up at five, six, or more inches of accumulated material — the single most common and most avoidable depth mistake homeowners make.